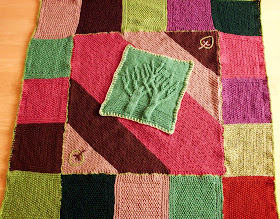
So here, at last, is the finished autumn blanket. I started it in a heatwave and finished it on a cold, wet and windy day. I have sent it to SIBOL and from there it will be sent on to a care home somewhere in the UK. I waited to blog about it until I was sure it had arrived as SIBOL's Sue is a new follower of my blog...woo hoo! I know she enjoys opening parcels of squishy cosiness and I didn't want to spoil the surprise.
This blanket had so many false starts that I think I eventually ended up not with Plan B but Plan Z. I originally intended to knit leaves and join them together. But I very soon realised that they needed blocking and probably would every time the blanket is washed. I'm sure the care home staff have other more important things to do. So that plan was abandoned.
I settled on knitting borders of moss stitch which is a lovely stitch that lays flat with absolutely no curling. The colours chose themselves because I already had most of them.
Putting the centre square into the border is when the sewing started.
- An expert crocheter probably could have done it in no time. But my efforts were abysmal. Hand-sewing was the only way for me.
- The stitches showed through slightly. So I devised a way of hiding them by laying a strand of wool over the join and securing it with tiny stitches. The final result is a bit wonky but much better than what it is hiding!!! I was congratulating myself on inventing a new stitch until I discovered that this stitch is so well known that it has a name...."couching".
- My favourite part of this blanket is the Twining Trees panel. I revived memories of learning blanket stitch at school and sewed it on at an angle as a bit of contrast to all the squares and straight lines.
- My attempts at embroidering leaves are passable. I tried some more elaborate leaf shapes but needed a lot more time to get them right. I wanted the blanket ready while we still have some leaves on the trees!
- Just before packing the blanket I had a mini panic fit about the Twining Trees panel coming off in the wash. So I adopted the belt and braces method and sewed another circuit of smaller invisible running stitches.
A lot of wool has gone into this blanket. I hope it keeps someone very warm.
After such a colourful and complicated project I am now going to reward myself with some mindless scarf knitting......total bliss.

Its such a gorgeous blanket, well done! And how sweet are you sending a surprise!
ReplyDeleteWell done, Una, it looks lovely! That double panel will also give extra warmth to the lap of its recipient. I'm sure Mrs Twins (Sue) will be delighted! Is that why you added the Twining Trees?
ReplyDeletehow daft am I! I never made the connection between Twining Trees and Mrs. Twins. I just loved the pattern when I found it and thought it was very suitable for a care home. Some people who knit this pattern actually frame it and give it as a wedding present.
DeleteWhat a fabulous unique blanket Una - will keep someone really cosy.
ReplyDeleteAli x
Yo had me from the Tree of Life in the center. It came out so well you cannot grudge the time.
ReplyDeleteit has turned out beautifully Una, some lucky recipient is going to love it. :)
ReplyDeleteIt's really pretty, Una. It sounds a bit complicated but it came out beautifully and I am sure it will be appreciated.
ReplyDeleteIts beautiful
ReplyDeleteYour hard work was rewarded with a beautiful result! It's a lovely blanket Una. Well done.
ReplyDelete