Pages

Monday, 30 December 2013

My Jana vest progress report....from oops to wow!


Here is a photo of my latest project: the Jana vest.  The photo is a bit washed out as it is late at night.  I thought the holey pattern might show up better in artificial light.  In an earlier post, I canvassed opinions about whether or not I should knit the cable pattern on the back.  The "ayes" won and, as you can see, the cable pattern is now on the back.  I've reached and passed the armholes.  I mentally allowed myself until the end of January to complete the back so I am pleased at how quickly this is knitting up.

I would have finished the back already but for a major frogging episode.  The cable pattern is a 32 row repeat.  I was well into the third repeat when I realised that the very first cable in the first repeat was going in the wrong direction.  I tried to live with it but couldn't.  I want people to look at the back of this vest and say "wow!" not "oops"  So I had to rip out right back to the ribbing.  But I'm really glad I did.  It is a very complicated pattern but looks stunning...... when it is done right (!)

This will be my New Year knitting project....or one of them.  I will still knit and make things for my favourite charities.  As well as that, I desperately need some new jumpers and have decided to try to knit them myself instead of buying mass-produced knitwear.  2014 could be an interesting year!

Happy New Year to all my readers.........


Saturday, 28 December 2013

Christmas knitting.....


I like to knit colourful things at Christmas and anything complicated is a no-no while there are so many distractions.  So I found a pattern for a baby kimono-style cardigan which interested me.  Here it is.  It used up only about 75g of yarn for the biggest size which should fit a 16" chest.  A great use for such a small amount of yarn.  The yarn is King Cole Comfort Prints because I had some left over and I really love the colours.  I was also able to use 2 pretty buttons from my big collection!

I found the pattern on Ravelry here.  It is basically knitted in one piece.  There is some seaming to do on the arms and sides, but it doesn't take long.  Some knitters on Ravelry comment that the neck is too small.  But the garter stitch edge is very stretchy and, from distant memory, it seems large enough for a baby's neck.

This is a lovely warm top as the front is 2 layers crossed over each other.  If the top is for a boy, all you do is cross them over in the opposite direction.  This works because the button holes are on both front pieces.  The holes on the "invisible" side are used for a ribbon tie inside the top.

I recommend this pattern to anyone who wants to try something a bit different.


Thursday, 26 December 2013

That's me sorted....


I finally have my family well trained.  I dropped massive hints about how much wool would be appreciated if anyone was looking for pressie ideas.  My sister followed my instructions to the letter and bought me the bright acrylic yarn at the top of the photo.  It really is that bright and has been set aside for charity blankets for care homes.  These have to be acrylic in order to survive industrial washing machines.  

I expected Hubby to completely ignore my hints and was amazed when he gave me this very expensive yarn in the bottom of the photo.  It is 100% wool so I will use it for something for me as I know I will wash it carefully.  It is a drab stone colour but goes well with my more colourful blouses.  So I'm looking for a suitable vest pattern.  Sadly, it is 4 ply which is making the search difficult.  I've reached the stage of considering doubling it up and using it for an aran pattern.  I have a couple of other things to finish first, so this will probably be a project for late winter/early spring.

I hope everyone had a great Christmas.  Happy hobbydays!


Saturday, 21 December 2013

Seasons greetings from me and the skating penguin...


Here's the fun brooch I bought to brighten up my new scarflet......a cute penguin complete with it's own snazzy blue scarf.  It captures my mood at the moment.  I can easily swap it for another brooch if I want something more elegant.  I've updated my profile photo to show me wearing the scarf.  

The photo is really small.  I'm not being shy; I just can't work out how to make it bigger!  UPDATE:  I just learned how to enter some CSS code which makes the profile photo bigger.  So I made it slightly bigger. (If I make it even bigger, all my sidebar buttons increase in size until they are too big.)  ANOTHER UPDATE:  I just managed to make the profile photo bigger without increasing the size of my sidebar buttons.  Now I really must stop fiddling with my template!

The photo has a sell-by date because I added some snowflake animations which will probably look a bit ridiculous in the middle of summer.  Hopefully, by then, I will have something else to model.

So that is it for 2013.  I'd like to send season's greetings to all the amazing people who read my blog.  When I started it, I had no idea how much I would enjoy it.  I've enjoyed reading all your comments.....I really do read and appreciate them all, even if I can't always think of a reply.


I've read some inspirational blogs, learned new skills, won some giveaways, been at the receiving end of some generous donations, and even appeared in a list of recommended craft blogs.  I didn't dream of any of that a year ago.  So I'm really looking forward to what 2014 might bring.


.


Wednesday, 18 December 2013

Clearing the decks....


I like to get everything tidied away before Christmas.  There was a little pile of sewing that I had pushed to the back of my mind until 2014.  But I found myself with some free time and decided to finish it off.  Here are 5 mama bags.  They are basically drawstring bags made to the same size as a pillow case.  These will go off to Greenfields Africa which is an organisation that distributes clothing, blankets and other items to new mothers and babies in Kenya and Uganda.  This is what their website says about the mama bags:

"a mama bag contains a cotton vest, a knitted cardigan, a beanie and bootees, a babygrow, and a blanket, plus locally bought soap, vaseline etc. To qualify for a mama bag, the mum is required to attend 3 ante-natal clinics during the pregnancy"

So they are an incentive for the mothers to attend ante-natal classes and they give them much needed supplies for the first few weeks of the babies' lives.

They cost me very little to make.  I bought the yellow gingham material for 49p per piece in a charity shop. The drawstrings are very long shoe laces and some thin braid that I have been saving for years.   The wine and grey material has sentimental value as it comes from a duvet which I placed my baby daughter on when she came home for the first time.  Eighteen years later this same "baby" managed to burn the duvet cover with her hair straighteners.  I rescued what was left of the material to make these bags.  Its great to know that it will be useful thousands of miles away.

What did I learn making these bags?:
  • how to make a drawstring bag!  I put only one drawstring into each bag and they close nicely.  The method of putting in 2 drawstrings works well in some bags, but caused a lot of bulk in these bigger bags.
  • how to sew French seams.  These bags will take a lot of punishment.  I always intended to sew a double seam and then found an article about French seams and how neat they are.  They hide the raw edges and I will definitely use this technique again.
  • gingham is not as simple to cut and sew as it should be.  I thought the straight lines would make cutting out and sewing straight bags very easy.  I was wrong. That was probably why someone else had donated the material to the charity shop!
I've said it before, but that is definitely the last sewing project of 2013.  (Famous last words?)

Sunday, 15 December 2013

Cosy scarflet....


I like short scarves.  I always knit mine shorter than a pattern requires because I tend to tuck them into my coat and I don't want lots of bulk.  I recently read a posting on Linda's Crafty Corner blog all about bow knot scarves.  These are tiny scarves that cross over neatly at the neck.  My crochet skills are not (yet) up to following the pattern for the lovely crochet version and I thought the knitted version was great for a child but a little too plain for me.  So I searched on Ravelry and found this pattern for the anthro-inspired-scarflet.

I have considered carefully whether or not to include a link to the pattern.  It is full of errors and I had to read the comments left by other knitters before I could complete it to my satisfaction.  What should have been a 2 day project extended into a third day while I struggled with the second leaf which is the part of the pattern that many knitters have had problems with.  However, the fact that over 1200 people have knitted this pattern is testament to how attractive it is.  It has enough detail to be interesting and the length and width can be altered easily.  Some knitters have made it thinner and longer to drape over a blouse.  Many knitters attach buttons or a brooch to the centre piece which makes it look really pretty.  Some even put them on their dogs and cats!

I used a navy blue dk yarn and a silver grey brushed dk yarn held together.  It is very warm.  The mottled effect tends to hide the stitch pattern but will go nicely with most of my winter jackets.  I made mine just long enough to hang loosely and it even looks good worn over a jumper indoors.  I might look for a pretty button or brooch to add to the centre.  What would you do?  If I have time over Christmas, I will update my profile photo to show myself modelling it.

I have made copious notes and corrections to my printed version of the pattern.  I will definitely knit this again and next time it will take only 2 days as I have ironed out all the problems.  Using prettier yarns and different lengths makes this a very versatile scarflet.  I can see myself making more of these for myself and also to give away as gifts.

Tuesday, 10 December 2013

I'm so lucky.....


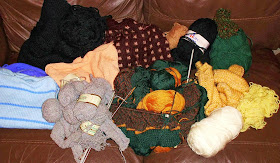
Look what arrived today; a glorious collection of yarn and unfinished knitting.  I'm in Heaven, which is quite appropriate as this was all donated by a UK convent that was sadly closing down.  The nuns contacted Loving Hands to ask whether we could make use of their craft materials.  One of the Loving Hands members, Helen, made several trips to the convent and came away with literally thousands of pounds worth of yarn, material, threads, needles etc.

Helen mentioned that there was some unfinished knitting.  I had enough wool at the time, but said that I could finish the knitting if it just needed buttons or sewing up.  I have oodles of buttons and I quite like sewing up....I know....I'm strange like that.

Well that was months ago.  Helen had a garage almost the size of an aircraft hangar and spent weeks with helpers sorting the materials and boxing it up for anyone who asked for it.  Loving Hands members knit, sew and crochet for charity so the nuns were happy that their materials were going to a good home. 

Well, my parcel arrived today.  I piled everything up on my brown sofa which was a bad choice as there is a lot of black and brown wool that doesn't really show up in the photo.  But you can get the gist of it.  There are some lovely balls of wool, some pieces waiting to be sewn together to make a teddy, and some knitting still on its needles. Seeing the needles was quite poignant.  It makes me wonder about the stories behind why the knitting wasn't finished.

The teddy pieces are complete except for the main body.  I can knit one in a different colour and make it look like a romper suit.  The unfinished knitting is a bit more unfinished than I had bargained for.  It seems to comprise jumper parts but no patterns to give me a clue as to how to proceed.  The quality of the knitting is amazing. Some of it is Fair Isle which I would not be able to continue even if I had the extra wool or patience.  I've decided the simplest thing will be for me to unravel the knitting and to reuse the yarn for my favourite hats, blankets and scarves.  Whatever I do, it will all eventually be put to a good use.

Thank you to the nuns and a big thank you to Helen for sorting all this out and even for paying the postage on dozens of large parcels.

Helen has now finished distributing everything.  But if anyone is curious about Loving Hands, now would be a good time to look at their website and to join the free forums. There is a wealth of information, patterns and the occasional freebie available.

i'm now going to spend a happy few hours unraveling and sorting the yarn.  My idea of bliss........

Wednesday, 4 December 2013

What would you do.....?


I fell in love with this pattern so much that I actually bought the book.  The recommended yarn is Rowan Wool Cotton which costs an arm and a leg.  But it receives such good reviews that I treated myself to some in French Navy.  I love it....it is my new best friend!  It is a pleasure to knit with and I am actually limiting myself to a few rows per day as I am enjoying it so much.  I also don't need this top until next spring and I have other things on the go.  But they are just secondary reasons.

Now, this is where I need your advice.  The pattern has a very eye-catching cable panel up the front of the top.  It also has it up the back.  I like it on the back.  It would be very plain otherwise and it actually gives a very slimming impression!  The question I have for all you experts is:

if you saw someone wearing this with the cable panel on the back, would you think she had her top on back to front?

I really would be interested to hear what you would do.  Back pattern or no back pattern?  I have nearly reached the point where I need to make the decision.......help!!  All comments gratefully received.

Tuesday, 3 December 2013

More girls' dresses....


Here is a little quintet of girls' dresses that are destined for Sew Scrumptious which is an organisation that distributes dresses and shorts to girls and boys living in Malawi, Kenya, India, Ghana, Uganda, Cameroon, Zimbabwe, Rwanda, Burundi, Ethiopia, Philippines, Tanzania and Zambia. 

These dresses are sometimes called pillowcase dresses as it is possible to make them from spare pillowcases. They are basically 2 pieces of material sewn together with ribbon ties at the shoulders.  I have left the ribbons undone for easy packing.  I also like to add a contrasting band at the hemline.  It takes longer but is worth the effort.

I don't have any spare pillowcases, so I bought a similar pattern and some suitable cotton material.  The Winnie the Pooh material came from a market stall at a good price.  The rest of the material came from a charity shop at an even better price.  They were selling large pieces of material for only 49p.  I managed to cut the two light blue dresses from one piece of material.  What a bargain. I made the mistake of oohing and aahing so much about the price that, when I went back the next day, they had doubled and even trebled it.  They still sold their material, but not to me!  The blue theme in the dresses is my way of keeping down costs for thread, bias tape and ribbon.

These particular dresses should fit girls aged approximately 4-6 years old.  I managed to buy material in the same charity shop that will be suitable for boys' shorts and I have found some easy patterns.  It seems that less than one in 10 items sent to Sew Scrumptious is shorts.  i can just see the boys' hopeful little faces when the donations arrive.  So next year I will sew some shorts to add to my parcel before I post it.

My sewing projects are finished for 2013.  I have some knitting left to do which will fill my dwindling free time.

Saturday, 30 November 2013

The autumn to winter scarves......


I'm supposed to be cutting back on knitting until the new year.  But I had the sudden urge to crochet a scarf in autumn colours.  That was followed by another urge to crochet one in winter colours!!  As I try to avoid putting yarn remnants back into the bag, I knitted 2 hats as well.  Isn't it strange how 2 adjacent seasons can have such different colour palettes?

The scarves and hats will fit smaller children, though the winter scarf is long enough for a teenager as well.  They will all go to a charity next year.

That's definitely IT for this year.  I have some sewing to do and I'm enjoying some mindless blanket knitting.  Otherwise, I am going to be quite busy with other things.

The crochet scarf pattern is here.  It is the only crochet scarf pattern I can do easily.
The autumn hat pattern is here.  The crown decreases are neat and roomy.  It always looks like a real head-shaped hat to me.  The winter hat is from a pattern called "Ellie's easiest hat" which I found on the Loving Hands website.  To access the patterns on this site you have to join up.  But it is free and a whole world of useful information will be available to you.

Thursday, 28 November 2013

............and the winner is

Well today is November 28th in my part of the world and I have just randomly drawn the winner of my Fair Trade giveaway.  The winner is Meghan of the Moby Knit blog.  

Meghan could you let me know your address.  I see you live in New Jersey where you are probably celebrating Thanksgiving Day today.  As we don't celebrate it in the UK, I had no idea of the importance of the date when I chose it as the end of my giveaway!!

I wish I could have given a little gift to all my followers.  Fret not, I have enjoyed it so much this year that I am planning to hold a giveaway every year.

Just a reminder of what will be winging its way very soon to Meghan:


Saturday, 23 November 2013

A knitting book review....


I rarely buy knitting patterns or books.  But I just had to spread the word about the fantastic knitting book that arrived in the post this morning.  It is "Fresh Fashion Knits" edited by Kate Buller and published by Potter Craft in 2010.  I am not connected in any way to this book.  I simply found a pattern on Ravelry and the only way to see it in full was to buy the book.  It never even crossed my mind to try to borrow this book from a library which is rather amazing as I work in one on Sundays!

The pattern that caught my attention was this one:


I like the centre detail.  The pattern also uses this detail on the back of the jumper. 

There are lots of patterns in the book that are now on my "to do" list.  Here are some of them:


I desperately need some new cardigans and jumpers but can't find anything I like in the shops.  I'm not pretending to look like the model in the book.  But if I go to the trouble of knitting these gorgeous tops, I will be motivated to stay slim and trim.  I can see that next year I will be busy knitting for me as well as for my various charities.  

I would say this book is aimed at the slightly more experienced knitter as there are no knitting instructions and the yarns recommended are all from Rowan.  However, an experienced knitter will be able to find suitable substitutes.

I bought my copy from Amazon and had to wait for it to come from the USA.  It was definitely worth the wait.

*****My Fair Trade giveaway is open until November 28th.  See here for more details.*****


Thursday, 21 November 2013

Another warm hat....


This hat is literally just 57 stitches by 24 rows....very quick to knit.  I used two different dk yarns together and the end result is soft, squishy and very warm.  This will fit a small child and is destined for one of the charities I knit for.  I'd love one of these in my size.  I've just been outdoors and it is very cold...the woolly hats are coming out.

The pattern is here or on the Ravelry site here.  It is knitted on straight needles.  I don't usually like seams on hats but this pattern is so well-written that the seam almost disappears when it is sewn up.  You can just about see it in the centre of my photo.

The only thing I am not keen on is the clunky crown decreases.  But they are not so obvious when the hat is being worn.  This hat used very little yarn and is a great way to use up oddments.

Wednesday, 20 November 2013

I had a dream....

......I also had a very uninspiring collection of brown yarn scraps left over from previous projects.  Then one night recently I had a dream that clearly showed a hat knitted with these scraps.  I wasn't sure I had enough yarn.  But I pressed on and here is the finished hat:


There are actually 3 different shades of brown in this hat.  My camera couldn't capture the contrasting stripe properly.  It is a lovely shade of pale tweedy brown.  For some reason my photos showed it as either grey or mauve....which it definitely isn't.  I love the colour and I used every last scrap of it.  The top stripe is a darker brown than the other stripes.  I was knitting by artificial light and didn't even notice the difference until I looked at it in the daylight.  It doesn't matter in this hat, but could have been a minor catastrophe in something else.

I'm pleased with the way this turned out.  This will fit a child up to age 3 or 4 and it will eventually go to one of the charities I knit for. It was very quick to knit and I have knitted this pattern many times before.  Here is the pattern.


*****My Fair Trade giveaway is open until November 28th.  See here for more details.*****

Friday, 8 November 2013

I can't believe it's not crochet.....


I recently needed to add a fairly wide border to a squares blanket I had sewn together. My crochet skills are basic and I didn't want to ruin the blanket.  I searched high and low and eventually found a knitting stitch called "purse stitch" in "The complete encyclopaedia of stitchcraft" by Mildred Graves Ryan.  I adapted it to make an edging for a blanket.

This is what I did:
  • dk yarn 
  • size 4mm needles
  • cast on 12 stitches
  • row 1:  slip one, knit one, (yarn over, purl 2 together) 4 times, knit 2
  • repeat this row until the desired length is reached
  • cast off

Yes...that's it...just one row repeated; quite monotonous, but easy and a great mindless project.  

The next photo shows what your knitting will look like on your needle.  


The finished result is strong, pretty and reversible.  If, like me, you end up with a wavy edge after sewing squares together, this is the edging for you.  It is a flexible stitch and, if you make it wide enough, the wavy effect disappears on the outer edge.  


You can cast on any even number of stitches.  My 12 stitches produced an edging measuring approximately 2.5 inches or 6.5 cms.  I felt that this was too wide to try to bend it around the blanket's corners, so I edged each side separately and stitched them together at the corners.  But a narrower edging should bend easily. Try casting on just 6 stitches if you want it to bend.

I used King Cole Comfort yarn as that is what I used to edge the individual squares. But this stitch would work with most yarns.  I can see it making a great scarf as well.  I knit with an average tension and 28 stitches would make me a scarf measuring approximately 7 inches or 18 cms wide.

I wouldn't describe this edging as a fast knit.  Crochet wins hands down for speed. But if you want a pretty edging and can't crochet, this is worth trying.  Feel free to ask me any questions and I'd love to see your finished projects.

CREDIT:  I am really grateful to Dayana from Ravelry who added the writing to my second photo.  Her lovely blog is Dayana Knits.


*****My Fair Trade giveaway is open until November 28th.  See here for more details.*****


***STOP PRESS*** I have now published a link to this pattern on the Ravelry website HERE.  

Thursday, 7 November 2013

Three more Aran hats complete my parcel....


I like this Aran hat pattern.  I have knitted it many times.  The pattern gives instructions for sizes ranging from newborn to youth.  This time I knitted 2 baby size hats (pale green) and 1 toddler size hat (light brown).  The green hats knitted up quickly as expected.  The light brown hat took longer because the wool was so painfully rough that I even had second thoughts about its suitability for a toddler's head.  However, I have soaked it in special wool detergent and it is now quite soft.  This wool came from a Freecycler who gave me a huge bag of assorted yarn.  I can see why it was unloved. But I think I saved it and made something useful.

These hats have now been posted off to Operation Orphan.  Hopefully I have made the deadline for sending items to the children in Syria.  These are the goodies that went into the box:


2 waistcoats
1 scarf
5 hats


My next project is a diagonal blanket which I am just going to enjoy knitting at a leisurely pace.....no deadlines to meet for this one.

*****My Fair Trade giveaway is open until November 28th.  See here for more details.*****


***STOP PRESS***  A few minutes after adding my photo of the 3 Aran hats to my Ravelry projects page the pattern designer contacted me asking for permission to feature it on her front page.  Of course.....I'm honoured!!

Tuesday, 5 November 2013

I'm having a Fair Trade giveaway....


It's nearly a year since I started blogging about my adventures in knitting, crochet and sewing.  In that time I have met lots of lovely bloggers and had a lot of fun.  I was also lucky enough to win a couple of giveaways and to receive some donated yarn.  So, today I decided to host my own giveaway.  It is open to followers of my blog who live anywhere in the world.

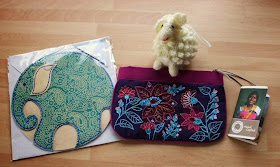
The winner will receive the Fair Trade craft items as shown in the photo.  

  • a beautiful zipped purse in shades of pink, purple and turquoise
  • an elephant greetings card
  • a hand knitted sheep ideal for hanging on a Christmas tree or in your craft room
All these items came from a Fair Trade shop in London's Soho.  The card was made in Nepal,  The sheep doesn't have a tag, but the sign in the shop said it was made in Peru.  The purse is also a Fair Trade hand crafted item, though I'm not sure which country it came from.

The important, boring bit:  to qualify for this giveaway all you have to do is leave a comment on this blog posting.  Your comment should let me know who you are and how you follow my blog.

The winner will be chosen at random.  The closing date for entries is November 28th and I will post the goodies soon after that.  

(Please note that if I am posting outside the UK and Europe, they might not arrive before Christmas.)

Good luck!!

Monday, 4 November 2013

The Lily Pond Blanket.....


One of my 2013 resolutions was to conquer my aversion to sewing up squares.  This is an irrational aversion as I actually enjoy sewing.  I recently joined the SIBOL group on Ravelry and noticed a request for people to help with sewing squares into blankets.  These blankets go to residents of care homes in the UK.  In a mad moment, I volunteered and a few days later a parcel of squares arrived.

The first photo shows the squares in their "before" state.  

The squares were all garter stitch and roughly the same size but a mixture of double knit and bulky yarn.   The sewing method that worked for me was:
  • block them into good square shapes.
  • edge each square with a row of double crochet (UK).  This was easier said than done. The squares were knitted by different people and had a different number of rows and knitting techniques.  I eventually gave up trying to crochet the same number of stitches on every edge and just went with the flow.  I used King Cole Comfort variegated yarn that contained all the colours in the squares.
  • experiment with layouts bearing in mind that I wanted the bulky yarn squares to be evenly spaced.  I then spaced out the bright green squares and then placed the others doing my best not to have too many plain blue squares together.
  • choose a joining method.  I settled on invisible whip stitch as the easiest method for joining squares that have different numbers of edge stitches.  
  • choose a joining yarn.  The variegated yarn didn't look right so I settled on blue.
  • chain stitch along the joins to strengthen them and make them look more pretty.  I found a good tutorial for chain stitch here.  It teaches an unusual but very easy method.
  • add a border.  This is where crochet beats knitting hands down.  It is much quicker even for novices like me.  But I could see I was going to ruin all my hard work by rows of wobbly crochet.  I looked online and in books for knitted edgings and eventually made up my own based on a stitch I found in a book.  I'm so happy with it that I will blog about it fully later on and maybe even add it to the Ravelry website. 
  • strengthen the border by adding a row of simple crochet chain stitches anchored to the border at regular intervals.  This gave a lovely curvy effect which balanced the straight lines of the blanket. 
  • add a water lily motif.
  • stand back and admire.
Yes, it was a lot of work.  But I enjoyed it.  Here's the finished blanket.  


All SIBOL blankets are named before wending their way to the care home residents.  I chose "The Lily Pond" as it looked like that to me after I arranged the squares.  Giving them a name brings them to life.  I'm posting this one tomorrow.  I'm glad it's finished. But I will miss it as well.  I've even offered to sew another one and I mulling over other ways to join the squares.  SIBOL always needs people to sew squares into blankets.  If you think you would like to do this or even to crochet or knit a blanket,  take a look at the SIBOL blog.

I'm really pleased with the way my first squares blanket turned out.   Ta dah!!

Monday, 21 October 2013

Milking butterflies.....


I love Flickr.  Someone who works there has a sense of humour.  I always read what it says on the screen when I am uploading photos and today it was "milking butterflies".  It brightened up what was until now a humdrum day.

In my last post I mentioned that I was going to combine some 2 ply and 4 ply wool.  Here are the baby hats and a scarf that I managed to knit.  The variegated mauve and purple yarn is 2 ply and the other yarn is 4 ply.  The hats are different colours because the 4 ply wool is cream on the left and lilac on the right.

All three items will eventually go to a charity for distribution to children in need.  I just need to make a few more things to fill a box before I post it. I'm guessing that I will miss the deadline for this winter's deliveries.  But there is always next year.

As usual the hat pattern is my favourite baby hat pattern.  The scarf is from a crochet pattern that, as a learner, I find fairly quick and easy.

Friday, 18 October 2013

More baby hats...


I recently went through my bag of wool scraps and used up all the pastel dk yarn.  A few days ago I made a start on the brighter/darker dk yarn scraps.  Some of the wool came in a bargain lot and some was kindly donated to me.  These are the baby hats I managed to knit.


  • The rust hat was a great way to use up an oddment of brown and some very dubious beige wool.  I like the way the colours work together.
  • The bright yellow in the next hat was from a ball of wool that had been used previously and was all crinkly.  A good soaking in special wool detergent has softened it up beautifully.
  • The green hat was the biggest surprise.  I love this shade of moss green and would definitely consider using it again for baby blankets or hats.
  • The variegated blue and pink yarn is one of my favourites.  I knitted a hat and scarf for myself and this is all that was left.  It is supposed to be dk weight but I had to add some fine coned yarn to it to make it the same thickness as the pink brim.
Most of these colours might seem strange for a baby.  But these are charity knits and will eventually go to countries that specifically request darker colours.  The charity I will probably send these to is Greenfields Africa.  This organisation gives baby clothes and blankets to pregnant women to encourage them to attend antenatal lessons.

I enjoyed knitting these hats.  There was a little bit of design skill needed when putting colours together and a little bit of maths skill needed when judging yarn weights.

The pattern I used is here.  I love this pattern.  It makes what I think of as a real head shaped hat and the decreases at the crown are very neat.  

My brighter/darker dk wool scraps are now nearly all used up.  But I have coned yarn and 4 ply yarn that is just crying out to be matched together to make more hats........so watch this space!


Wednesday, 16 October 2013

Owl(ish) mitts....


I recently blogged about some fingerless gloves I had knitted for my sister.  They were so quick and easy that I decided to knit some for my daughter.  This time I cast on only 26 stitches as my daughter has a slim hand.  

I used the wool that was left over from a scarf I knitted for her last month.  Once again the wool was chosen for warmth.  These will never be delicate fashion items!

I decided to add an owl motif.  The owls are based loosely on a chart I found on Ravelry.  The chart is a lot more detailed.  But I didn't have enough stitches or rows to knit the full design. 

I fully intended to knit it in moss stitch but was concentrating so much on the chart that I didn't notice I was actually knitting reverse stocking stitch until it was too late. Moss stitch would have shown up better, so that is a lesson learned for the future.  I could have easily ripped the work back.  But I genuinely don't think my daughter will notice the difference.  She will just be amazed to see owls on her gloves.

The eyes are pearls that came from a broken bracelet....waste not, want not.  It was the first time I have ever knitted with beads or pearls and I was amazed at how easy it was.

(Note to self: 26 stitches fits me perfectly as well.  So cast on this number if I ever knit some pour moi.)


Sunday, 13 October 2013

Little knitted waistcoats....


This is a waistcoat I knit from time to time as it is easy and quick.  It is knitted in one piece and the only sewing is the side seams and buttons.  It calls for dk yarn to be used doubled.  I chose a navy blue yarn and combined it with a pale blue yarn that has little fluffy white bits in it.  The end result is chunky and warm and it should fit a child aged 3-4 years old.

 The pale blue yarn has some wool content and I think it might be in the white fluff.  Normally I am wary of using wool that needs to be handwashed.  But these waistcoats will be going to a charity that distributes items to parts of the world where electric washing machines are not used.  So that won't be a problem.

The pattern is called "Mayflower's Basic Bodywarmer" and is available free to registered members of the Loving Hands website.  This is a free website for people who knit, crochet or sew and is well worth looking at.

Thursday, 10 October 2013

Very quick fingerless gloves pattern.....


I just knitted these fingerless gloves.  The pattern is so quick and easy.....just 34 rows on straight needles.  The dk yarn is used doubled so it knits up very quickly and makes a very strong and warm glove.  I'd say they are functional rather than fashionable.  The photo makes the colours look washed out.  They are actually a very vibrant dark pink and navy blue.

The pattern is for men's gloves and these are for my sister!  Her hands are much larger than mine so the gloves look huge on me in the photo.  But they have a lot of stretch and will be perfect for my sister.  I noticed on Ravelry that lots of people knit this pattern for women.  

It's easy to adjust this pattern.  I cast on 30 stitches as the pattern suggested.  But by subtracting or adding 4 stitches these could fit hands ranging from dainty to enormous.

The pattern is here.

Friday, 4 October 2013

A quick scarf pour moi....


I knitted a hat with this wool so the obvious next thing to do was to knit a matching scarf.  This wool came as part of a bargain lot and has lost its labels.  It seems to be a type of mohair and I used the wraps-per-inch method to deduce that it is probably a double knitting yarn....though a bit on the thin side.  Clever shawl knitters could have used it as it was to make a lacy shawl.  But I just wanted a chunky warm scarf so I knitted with 2 balls of yarn together.

I only had enough wool for a short scarf but that is fine as I like to just cross them at the neck and tuck them into my jacket.  I love the colour.  It is a mixture of blue with bands of pink and very pale green.....just enough to cheer up a dull winter's day.

I remembered too late that the matching hat was knitted in rib.  If I was being super clever I would have knitted the scarf in rib.  But I didn't and life goes on.  Hey ho.  It's not the end of the world as the hat might get an airing once or twice a year, whereas the scarf will be worn regularly.

Note to self:
2 strands of dk yarn together
Size 5mm knitting needles
Cast on 29 stitches
Knit in garter stitch rows to desired length


Wednesday, 2 October 2013

I can breathe again....the smelly Aran wool is all used up....


Here are the hats I managed to knit with the smelly Aran wool I  blogged  about recently.  Once upon a time, someone was so in love with their Aran jumper that they unraveled the wool to use again.  It's just a pity they didn't wash it first.  I ended up with the wool in a bargain lot and recognised quality even though it was in a challenging condition. It must be my Celtic ancestry, but I was really determined to reuse this Aran wool.  

There were originally 6 hats.  Daughter wanted one of them.  She actually needs it as she travels a long distance to university and works outdoors at the weekend.  So I was happy for her to take it and secretly pleased that such a trendy young thing liked something I had knitted!!  I'm afraid the sixth hat went into the recycling bin as no amount of washing would remove the stains from the wool.  My local Council recycles fibre and fabric and turns it into insulation, so it wasn't wasted. 

The remaining hats have all been soaked and washed twice.  There is no trace of anything unpleasant and they washed exceedingly well.  The whole process was well worth it.  I posted the hats and the scarves in the photo to Operation Orphan which is an organisation that distributes warm clothing to children in many countries including Syria.  I initially intended to send these items to a UK charity but the recent news from Syria persuaded me that they are needed more there.  I can't imagine what it must be like to leave your home and worldly goods and march to another country.  I don't want to get all serious and political in what is supposed to be a knitting blog, but what human beings do to each other is unbelievable.  Rant over.


Friday, 27 September 2013

Baby scrappy scarf.....


In July I blogged about making a ball of wool from remnants.  This week I found time to knit it into a little baby scarf.  It measures 35" by 4.5" and is for the Keep a Child Warm project run by Operation Orphan.  This is an organisation that distributes warm clothing to children in many countries.  I read somewhere that they needed scarves to fit the toddlers and babies, so this will be perfect.

For this scarf I used a very long circular knitting needle and cast on 180 stitches.  I then just knitted in garter stitch rows until I ran out of wool.  I now officially have no more scraps of white or pastel dk yarn.  Woo hoo!